n8n has taken over a huge chunk of the AI automation market. Even if you prefer building custom automations with FastAPI or Express webhooks, if you work in AI, you’ll eventually encounter an n8n project. So it’s a great skill to have.
In this tutorial, you’re going to build an agentic RAG workflow in n8n that connects to open models from Hugging Face, searches a local vector store, and uses an MCP server for live web research. By the end, you’ll understand how n8n works, how to run it on a VPS, and how modern RAG differs from the old-school approach.
What is n8n?
n8n is an open-source workflow automation tool. Think of it as a visual alternative to writing custom backend code for your automations.
Instead of writing a FastAPI app and wiring together a bunch of API calls, you get a canvas with nodes and edges:
- Nodes are individual steps — a trigger, an API call, a database query, an AI model call.
- Edges connect them together to form a complete workflow.
You can also run custom JavaScript or Python inside any node, so it’s not purely no-code — it’s low-code with escape hatches for developers.
n8n has a huge library of integrations: Gmail, Google Drive, Notion, Slack, databases, AI models, and more. The key difference from tools like Zapier or Make is that n8n has first-class support for AI agents. You can give an agent multiple tools and let it decide which one to call at runtime.
Running n8n
You have two options:
- n8n Cloud — hosted by n8n, fastest way to get started. You get a URL you can connect to from anywhere.
- Self-hosted — run it on Docker or via NPX on your own VPS. This gives you full control.
For this tutorial, I’ll show the Docker setup since that’s what you’d use on a VPS:
docker volume create n8n_data
docker run -d \
  --name n8n \
  -p 5678:5678 \
  -v n8n_data:/home/node/.n8n \
  docker.n8n.io/n8nio/n8n
Once it’s running, open http://localhost:5678 in your browser to access the editor.
How RAG Has Changed
Before we build anything, let’s talk about how RAG (Retrieval-Augmented Generation) has evolved. If you learned RAG a few years ago, the core idea is the same, but the production pattern has changed significantly.
Old-school RAG
Old RAG looked like this:
- User sends a message.
- Query rewriting step — combine the chat history and current message into a search query.
- Embed the rewritten query with the same model used during ingestion.
- Run vector search against the database.
- Re-ranking — use a second model to reorder the results.
- Put the top results into a prompt and send to the LLM.
- Return the answer.
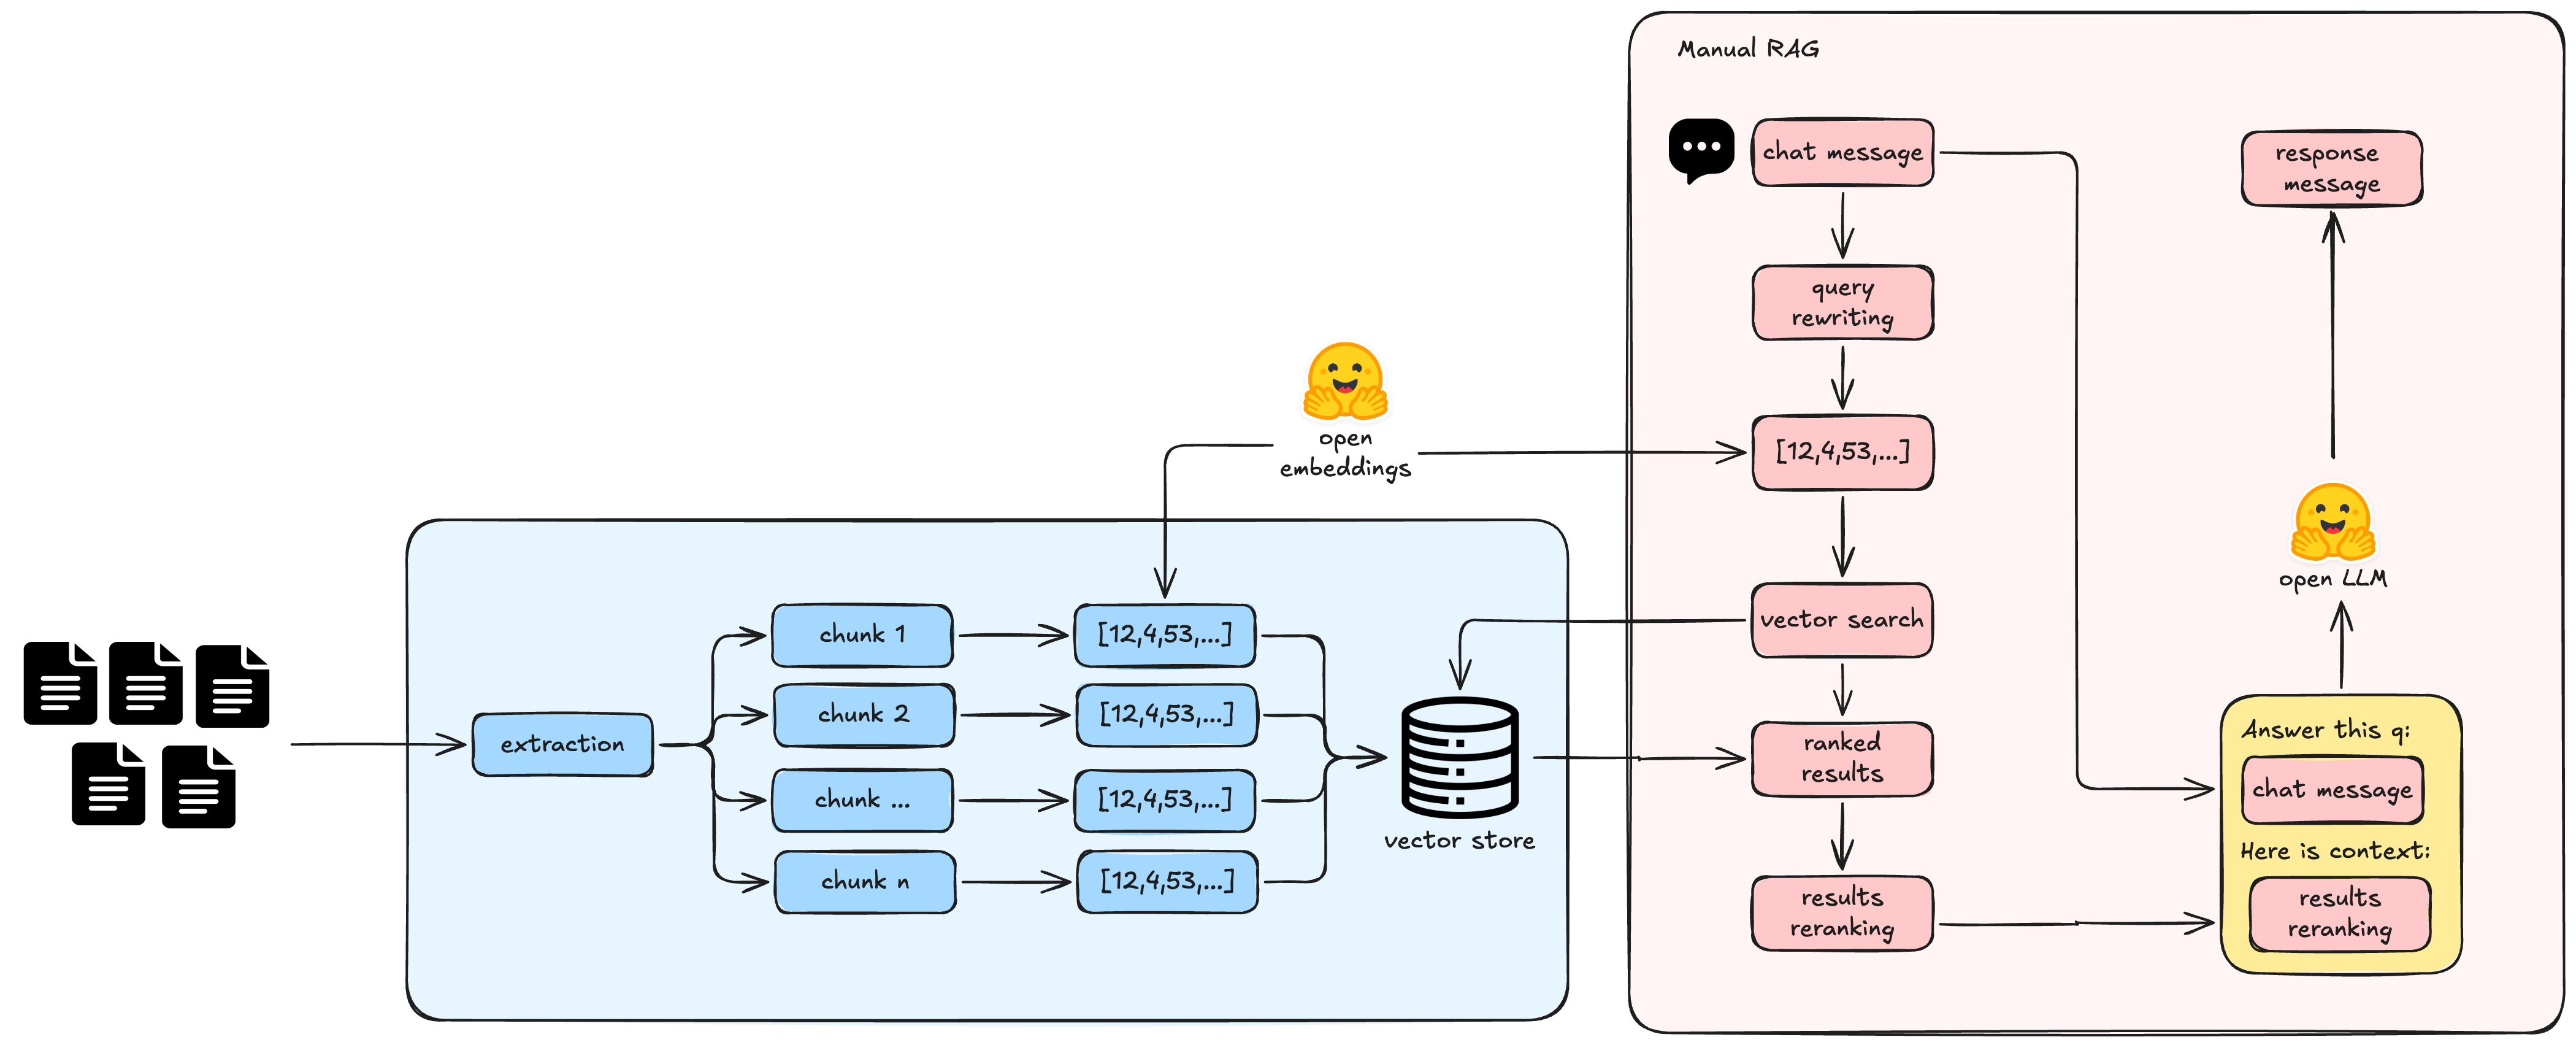
This worked, but it was rigid. You had to hard-code when the agent should search the vector store. If the user asked something unrelated to your docs, the system would still try to search.
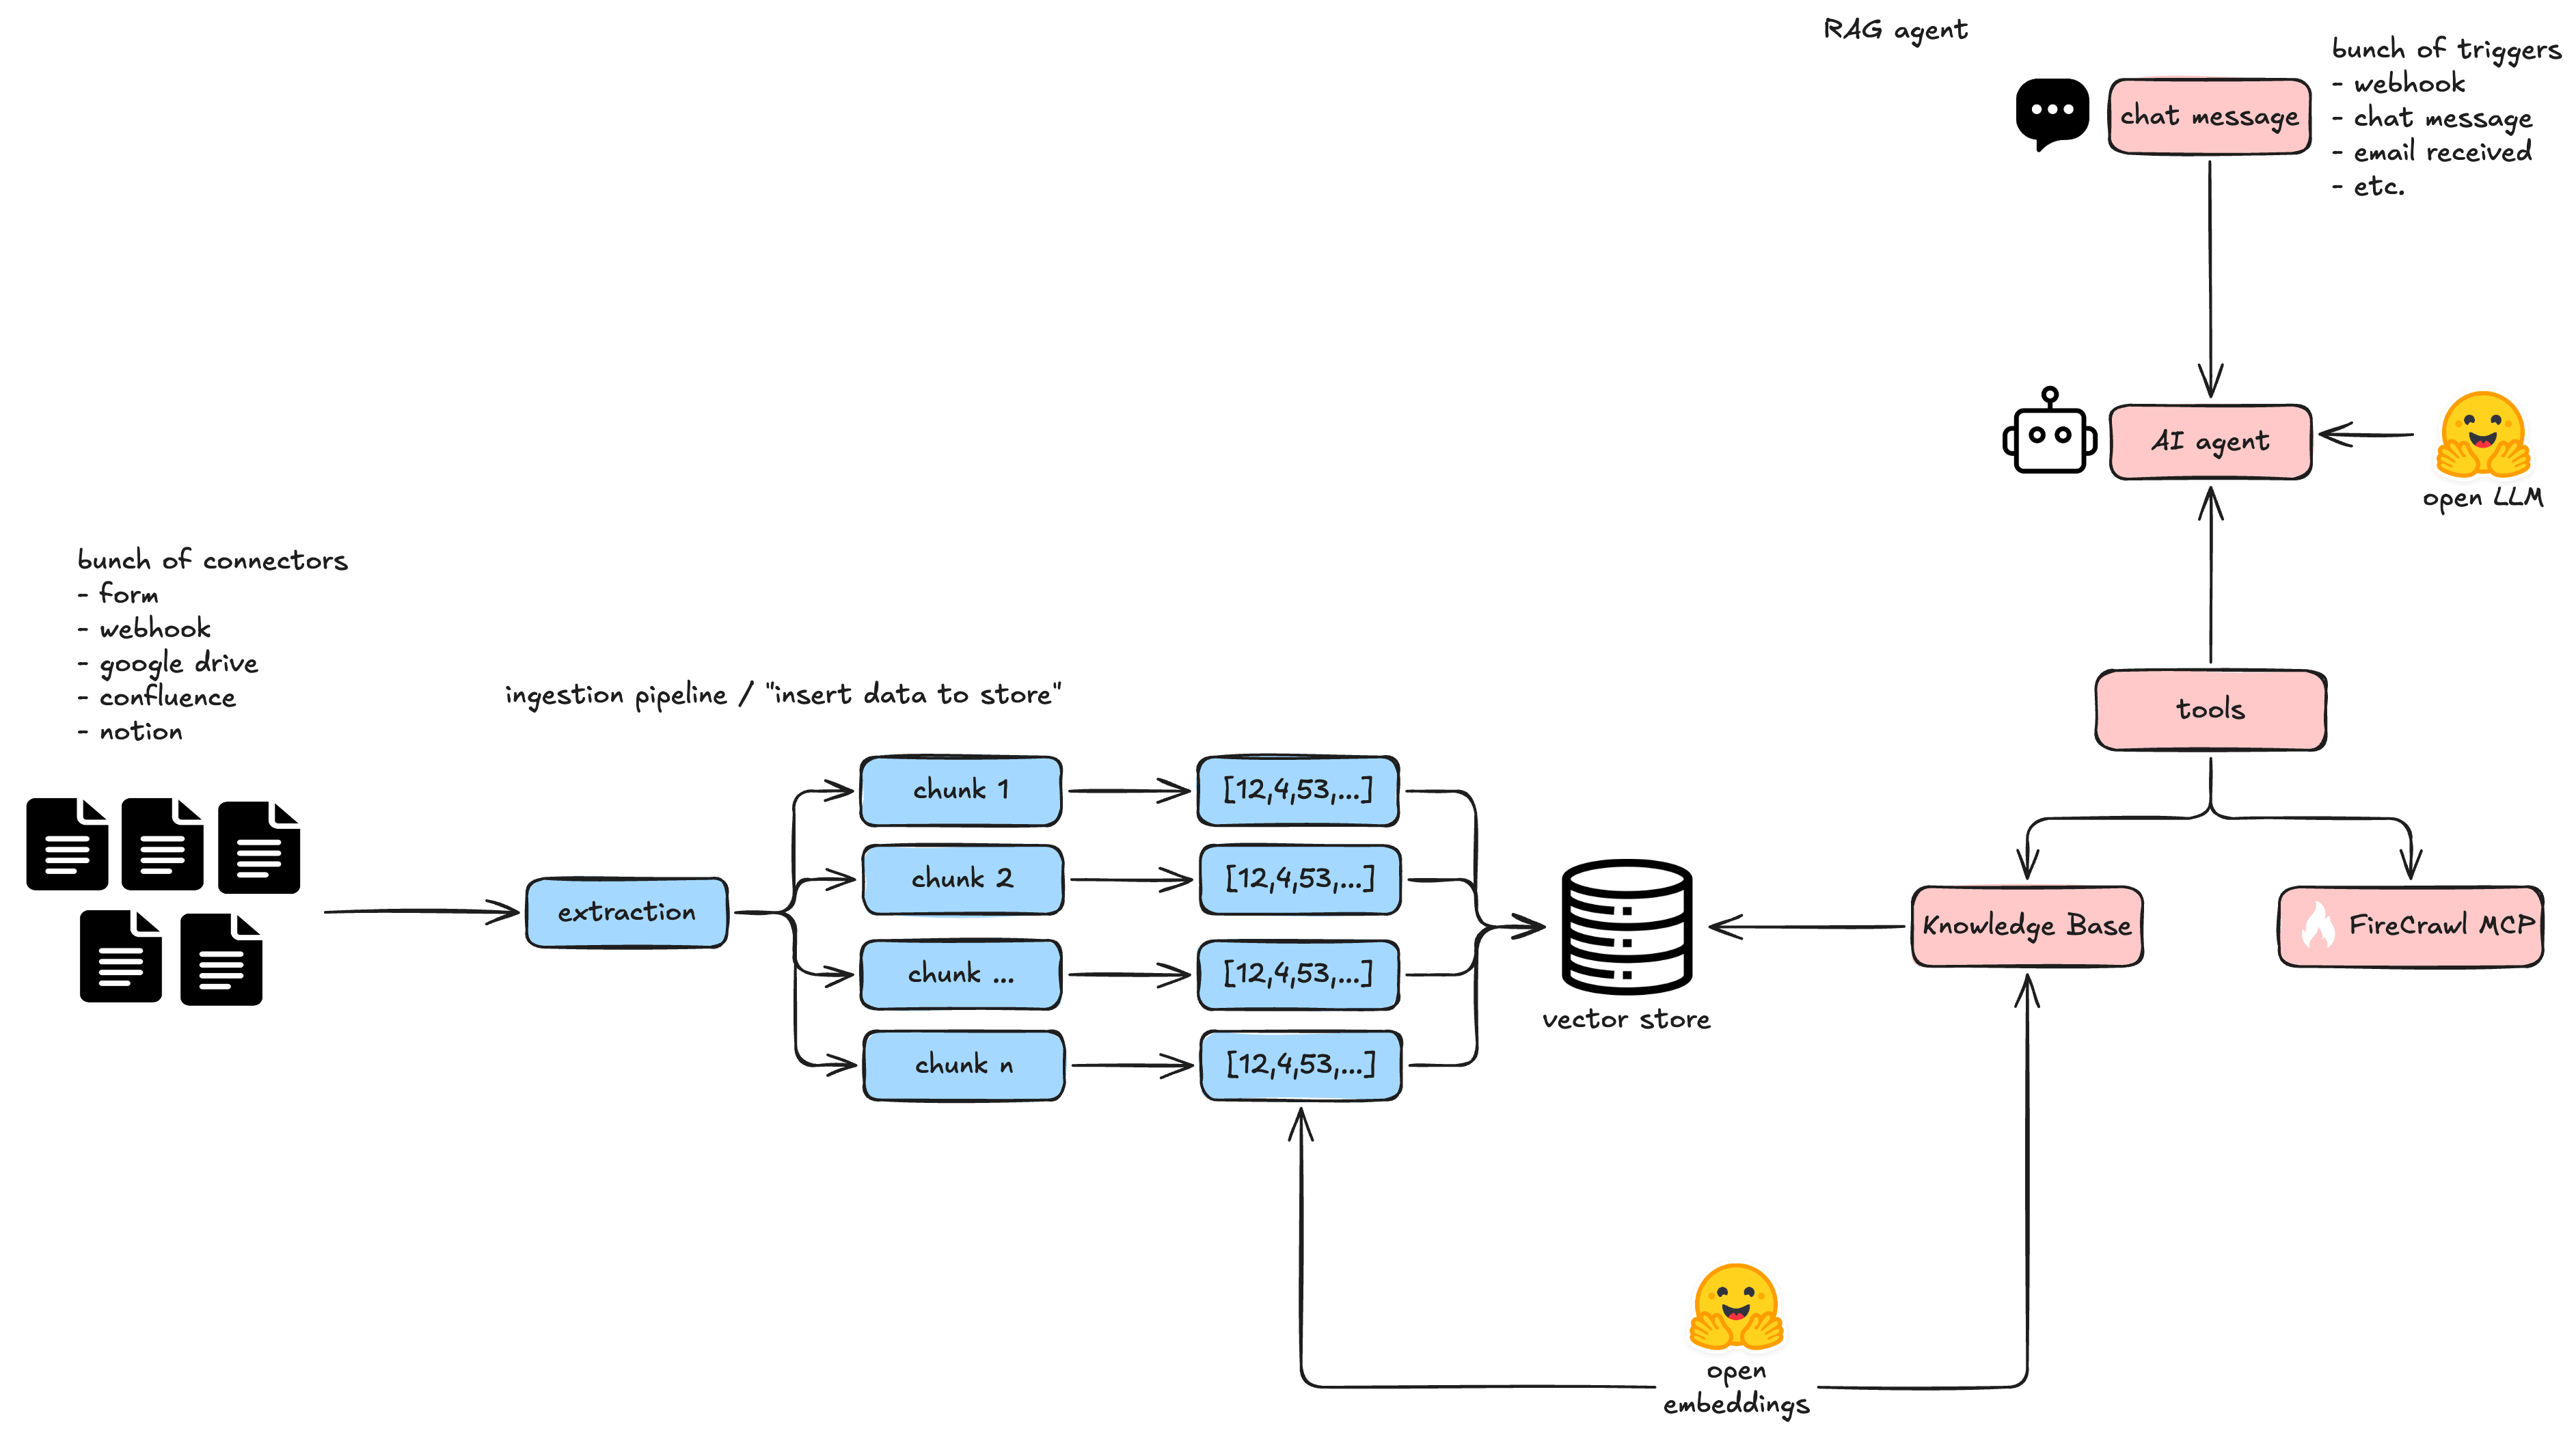
Agentic RAG
Modern agentic RAG is much simpler and more reliable. The key difference: you expose the vector store as a tool, and the agent decides when to use it.
- User sends a message.
- The AI agent sees that it has a
query_datatool that can search the vector store. - The agent writes its own search query — this is implicit query rewriting without a separate node.
- The tool embeds the query (using the same embedding model from ingestion) and searches the vector store.
- The agent receives the results, decides which ones are useful, and answers the user.
The agent can also call multiple tools in sequence. For example, it might search the vector store, then use Firecrawl to look something up on the web, then combine both results in its answer.
Key changes to understand
- Query rewriting is implicit — the agent generates its own search query instead of you pre-processing it.
- No hard-coded routing — the agent decides whether to search the vector store at all.
- Multi-tool agents — the agent can call web search, database queries, APIs, and more in the same workflow.
- The same embedding model must be used for both ingestion (when you stored the data) and retrieval (when you search). If you embedded with
nomic-embed-textduring ingestion, you must usenomic-embed-textin the query tool too.
The Architecture: Two Workflows
In this tutorial we build two workflows inside n8n:
- Ingestion workflow — takes documents, chunks them, embeds them, and stores vectors in a vector store.
- Runtime workflow — receives a chat message, runs the AI agent with vector search and MCP tools, and returns a response.
Splitting them makes each one easier to understand and debug. The ingestion workflow runs once (or on a schedule). The runtime workflow runs every time a user sends a message.
Building the Ingestion Workflow
Step 1: Add a trigger
Start a new workflow and add a trigger. For the demo, I’ll use an n8n Form node — it exposes an HTML form at a public URL where anyone can upload a file. This is useful for ingesting documents without wiring up a full integration.
In the form node, I added a single field: a file upload. You can also trigger the ingestion workflow from Gmail, Google Drive, a webhook, or any other n8n trigger.
Step 2: Add the vector store node
Go to AI → Agents → Other AI Nodes → Vector Stores and select the one you want to use. For this demo I’m using n8n’s built-in simple vector store (stored in memory), but you can also connect to Chroma, Qdrant, Pinecone, or other vector databases.
Configure the node:
- Operation: Insert documents
- Vector Store: Create a new one or select an existing one
- Embedding batch size: Controls how many chunks get embedded at once
Step 3: Add an embeddings node
Connect a Hugging Face Inference node to the vector store node. This is what turns your text chunks into numerical vectors.
The setup:
- Create a Hugging Face access token with read repositories and inference providers permissions.
- In n8n, add a new credential for Hugging Face and paste your token.
- Select an embedding model. I went to Hugging Face → Models → Filter by task → Feature Extraction and picked a popular sentence-transformer model like
nomic-embed-text. - Paste the model ID into the embeddings node.
Step 4: Add a data loader
Connect a Document Load Files node to extract text from uploaded files (like PDFs). Configure it to detect the MIME type automatically and use simple text splitting for chunking.
Note on chunking: Simple character-based splitting works for demos, but production systems use more sophisticated chunking strategies (like Unstructured’s semantic chunker) that keep related content together in the same chunk. This matters for both retrieval quality and generation context.
Step 5: Test the ingestion
Click Execute Node on the vector store node to run just that step. Upload a test PDF and check the output — you should see the extracted page content and a count of how many items were added to the vector store.
Building the Retrieval Workflow
Step 1: Add a chat trigger
Create a second workflow in the same n8n workspace. Add a Chat Trigger node — this exposes a chat interface at a public URL. Anyone who visits that URL can talk to your AI agent.
For production, you’ll want to add authentication (basic auth or n8n user auth). For the demo, I left it open.
Step 2: Add an AI Agent node
Go to AI → Agents → AI Agent. This node needs three connections:
- Chat Model — the LLM that powers the agent.
- Tools — what the agent can do.
- Memory (optional) — for conversation history.
Step 3: Connect an open model from Hugging Face
For the chat model, I used an OpenAI node but pointed it to Hugging Face’s router instead of OpenAI’s API. This gives you maximum flexibility — you can switch between MiniMax, Kimi, GLM, DeepSeek, and any other provider that has an OpenAI-compatible endpoint, all through the same n8n node.
Configure it like this:
- Credential: Use your Hugging Face access token (the same one from the embeddings step).
- Base URL:
https://router.huggingface.co/v1 - Model: The model ID you want to call, e.g.
minimax/M2.7. You can find model IDs on Hugging Face under the Inference Providers filter.
This approach is significantly cheaper than using OpenAI or Anthropic. For example, MiniMax M2.7 is around $1 per million output tokens, while GPT-4.5 is $30 per million output tokens.
Alternative: You can also use the native Hugging Face Inference Model node and paste the model ID directly. The OpenAI node approach just gives you a searchable model list and more control over the base URL.
Step 4: Add the query data tool
Add a Query Data tool to the AI agent. Configure it:
- Operation: Retrieval
- Description: A clear description of what this tool does — the model reads this to decide whether to call it.
- Vector Store: Select your test store.
- Limit: Number of results to return (I used 4).
- Include Metadata: Yes — so the model knows which page each result came from for citations.
Step 5: Connect an MCP server (Firecrawl)
Add an MCP Client Tool node and point it to your MCP server. For this demo, I used Firecrawl — a web scraping and search tool that lets the agent search the internet, scrape pages, and extract structured data.
Configure:
- Endpoint: Your MCP server URL.
- Authentication: Your API key (for Firecrawl, it’s included in the endpoint URL).
- Transport: Streamable HTTP.
The MCP server adds web research capabilities on top of the vector search. The agent can now answer questions about your documents and current events from the web, all in the same workflow.
Step 6: Write the system prompt
Edit the agent’s System Message to define the agent’s role and capabilities:
You're a helpful assistant specialized in research. You have access to the following tools to complete the user's request:
- A vector search tool (search your knowledge base)
- The Firecrawl MCP (access the internet and scrape pages)
Add any additional heuristics, like telling the agent not to scrape entire Wikipedia pages (it will run out of context).
Step 7: Test the agent
Open the chat interface and send a message:
“Hello, how are you?” → The agent responds directly. No tools needed.
“What do the statistics reveal in the document in the knowledge base?” → The agent calls the query data tool. You can see in the execution logs that it embedded the query, searched the vector store, and returned results from the uploaded PDF.
“What are the latest news related to the canal crisis?” → The agent recognizes this isn’t in your local docs and calls Firecrawl instead. It runs multiple tool calls (search, scrape) and returns a current answer with sources.
Observability
n8n gives you built-in observability. Click Executions in the sidebar to see every run of every workflow. Each execution shows:
- Which workflow was triggered.
- How long it took.
- Which nodes succeeded or failed.
- Full input/output data for each node.
This makes debugging straightforward — if a query returns bad results, you can inspect the exact tool call, the retrieved chunks, and the final answer to figure out what went wrong.
Bonus: Generate n8n Workflows with an AI Coding Agent
Here’s something powerful: n8n workflows are JSON. You can ask an AI coding agent like Claude or Codex to draft a complete workflow for you, and then paste the JSON directly into n8n’s canvas.
This works great as a starting point, but you still need to:
- Bind credentials (replace placeholders with your actual API keys).
- Check that node versions match what’s in the generated JSON.
- Verify expressions and data transformations.
- Test error paths and edge cases.
It’s a great accelerator, but it’s not a substitute for understanding the nodes.
Use Cases for n8n + RAG
The workflow we built is a foundation. You can extend it in several directions:
- Customer support — add a webhook trigger, route action requests to a CRM or ticketing system.
- Lead routing — agents that research prospects and route them to the right sales team.
- Content automation — scheduled workflows that research a topic, generate a blog post draft, and post it to your CMS.
- DevOps alerts — AI agents that monitor your infrastructure and send summaries or escalation alerts.