
Links:
- Exa
- GitHub Repo: https://github.com/alejandro-ao/exa-crewai
- Follow me on X (Twitter): @alejandro_ao
Introduction
In the last few months, there has been growing interest in building AI agents that can perform tasks for us. These agents can be used to automate repetitive tasks, like generating text or creating images, and even to perform more complex tasks like research and data analysis.
What We Will Build
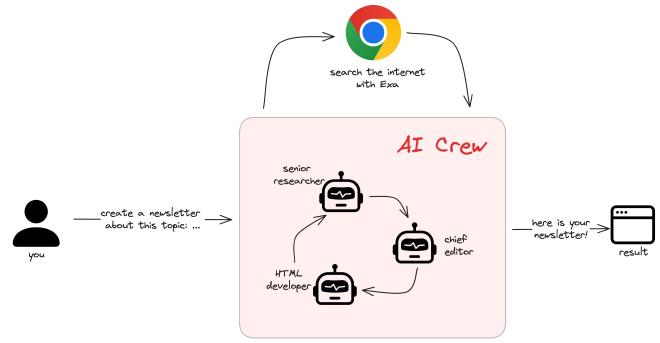
In this tutorial, we use Exa and CrewAI to build a team of AI research agents who, given any topic, can perform the following tasks for us:
- Research and summarize the latest news on the given topic.
- Verify that the sources are correct and that the articles are relevant to the selected topic.
- Compile the top stories into a newsletter using an HTML template.
What We Will Learn
In order to build this, we will use:
- CrewAI: a framework to orchestrate a team of AI agents.
- Exa: the first semantic search API that can retrieve high-quality, relevant web content for our LLM.
What Is Exa
Very broadly, Exa is a semantic search engine. This means that you can search for information on the web using natural language rather than keywords. You can think of it as an alternative to Google, but instead of searching by ‘keywords’, it searches by ‘meaning’. You can get 1000 free Exa requests just for signing up!
Semantic Search
The fact that Exa uses semantic search is especially useful for our project, and will allow us to find the exact news that we are looking for.
As mentioned before, we will be creating a research agent. This agent should be able to find the latest news on a given topic, which is something that semantic search is better for.
Think about it: if you search for ’latest news on AI’ on Google, you will get a lot of front pages of news websites and blogs that talk about AI. Like this:
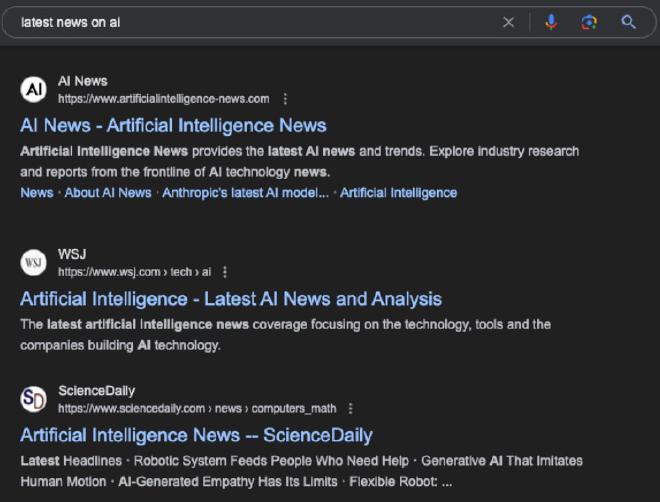
But we don’t want the front pages of blogs that post news about AI. We want the latest news articles themselves. This is what makes Exa so unique: it is able to tell the meaning of the query and return results that correspond to that meaning, not just the keywords.
For contrast, when looking for ’latest news on AI’ on Exa, you get this:
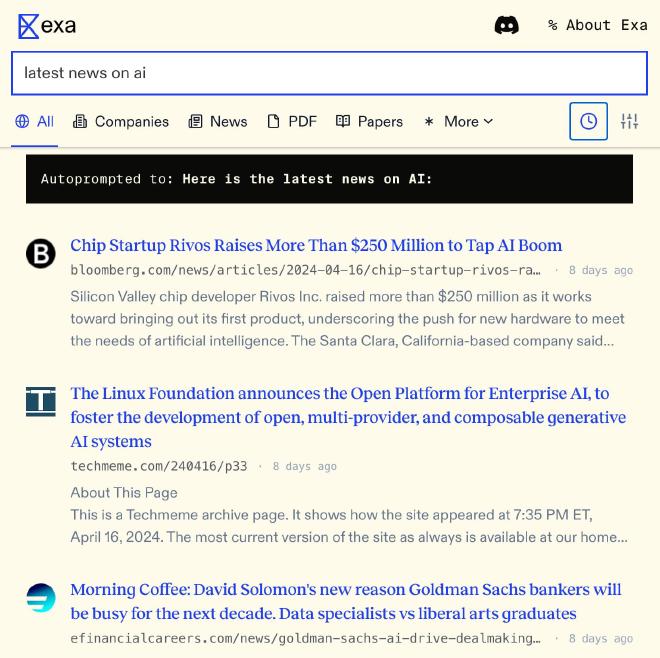
This is a much better result for our research agent.
What Is CrewAI
CrewAI is an orchestration system that allows you to create a team of AI agents that can perform tasks for you. With very little code, you can design a crew of agents that can reason by themselves, use tools to perform tasks, and communicate with each other to achieve a common goal.
To install CrewAI, you can use pip:
$ pip install crewai
To learn more about CrewAI, you can visit my step-by-step guide on how to use it here.
Step 1: Create the Crew
The first thing to do is to create the crew that will perform the tasks for us. We can build it ourselves using the core components of CrewAI (agents, tools, and tasks) or we can use the CrewAI CLI to create the crew for us. Let’s use the CLI to create the crew:
$ pip install crewai
$ crewai new newsletter-crew
This will create a new folder called newsletter-crew. You will find here all the components that you will need to create and orchestrate your agents. In it, you can also find the src/config folder, which contains the configuration files for your crew: agents.yaml and tasks.yaml. These will be automatically loaded to the CrewAI system if you are using the CLI.
Consider that this command initializes a Poetry project, so if you want to add any dependencies, you should do it using Poetry:
$ poetry add my-dependency
Step 2: Create the Tasks
Input and Output
Before we start building our crew, we need to define the tasks that our agents will need to complete. This is the backbone of your crew. Once you have the tasks that your agents will perform, you can start creating your agents. But in order to define your tasks, you need to know what your input and expected output are. In our case:
- Input: the topic of the newsletter
- Output: the HTML code of the newsletter.
Once you have that, you can start listing the tasks that your agents will need to complete to get from input to expected output. Think of it as a to-do list for your agents.
How to Define Tasks
This is usually where things can get tricky. But don’t worry! With some practice, you will be able to create a set of tasks for any automation within a few minutes!
My advice is to make a list of the to-do items that you would need to complete the task yourself. Then, break down these items into specific and granular tasks that your agents can perform.
Here are some tips for creating your crew:
- Avoid tasks that are too complex: If you try to perform too many actions in a single task, it can confuse the agent. For example, asking it to research a topic, summarize it, expand it, and reorder the results might be too much. Instead, break down the task into smaller, simpler tasks.
- Perform thorough testing until you get reliable results: You will need to run your crew several times, varying your input to make sure that your agents are working correctly.
- Have a monitoring setup: We will not cover monitoring and observability in this tutorial, but consider that you should be able to trace what your agents are thinking and doing. This is crucial for improving your prompts.
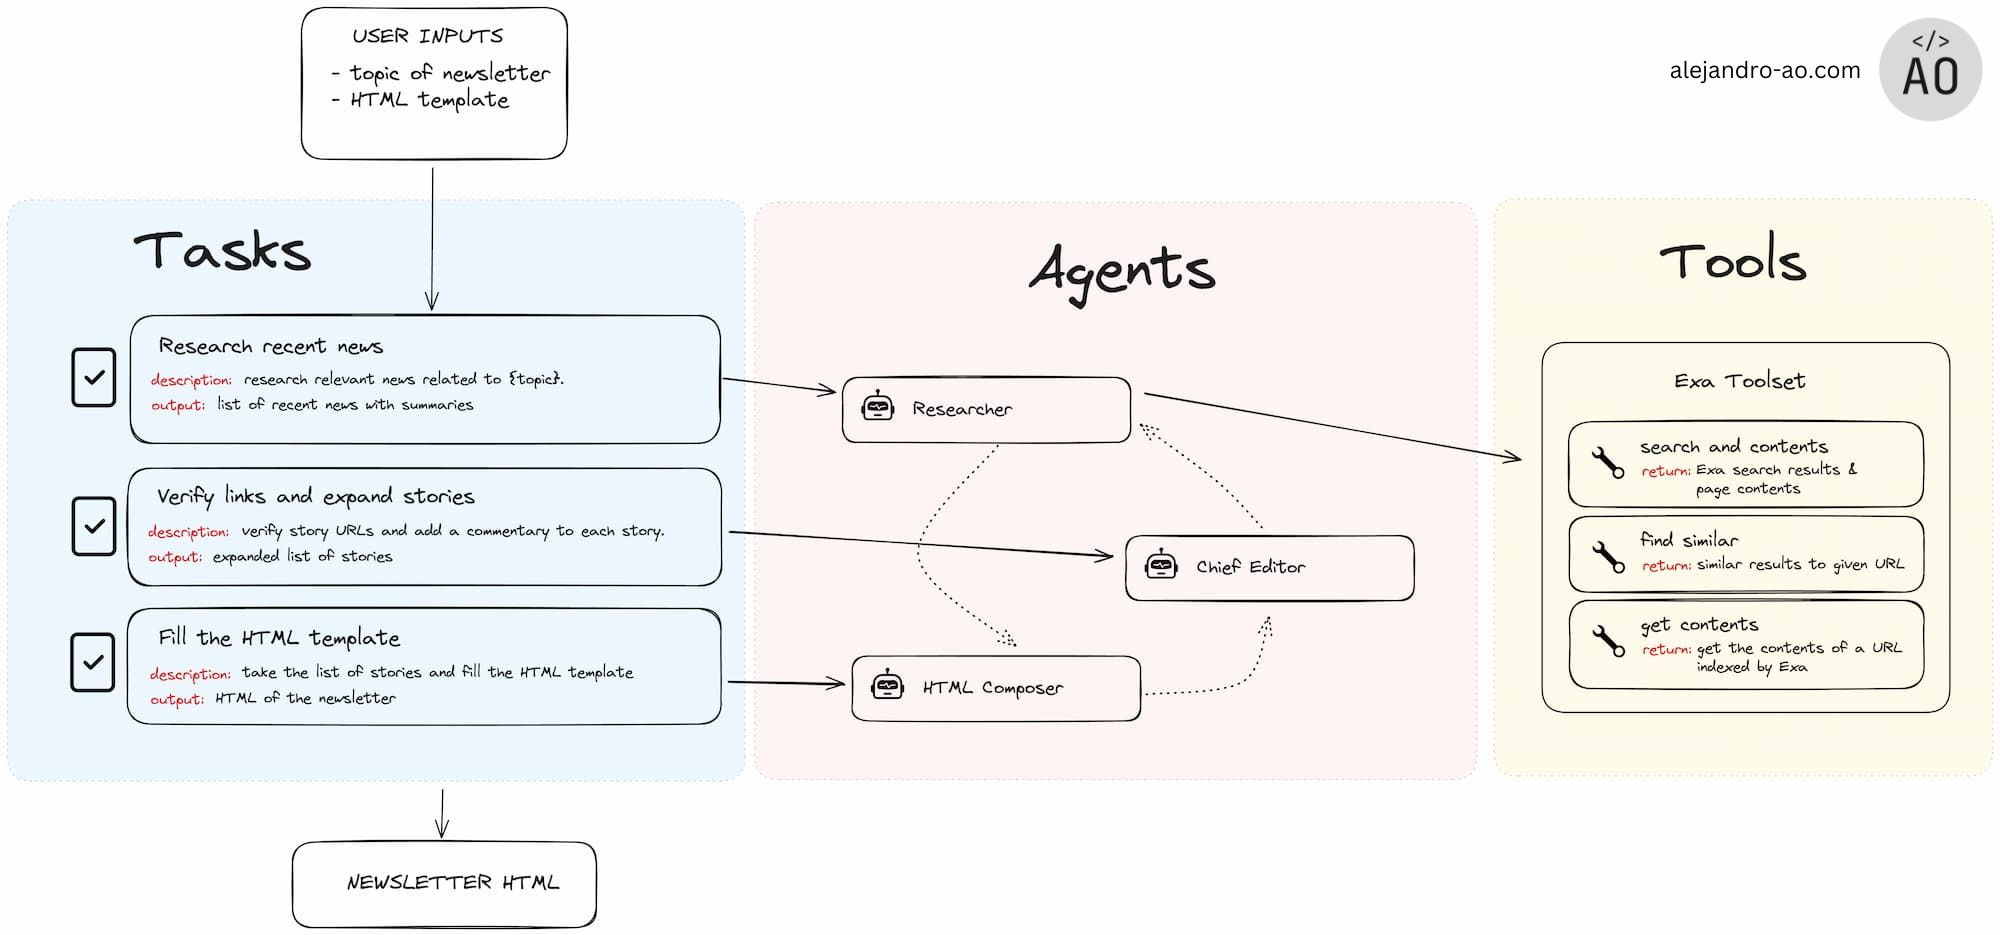
For this tutorial, our tasks will be:
Research task. To complete this task, the agent will need to:
- Search for the latest news on the given topic.
- Select the most relevant articles.
- Summarize the articles.
Edit task. To complete this task, the agent will need to verify that the sources are correct and that the articles are relevant to the selected topic. The agent in charge of this task will also need to improve the summary, add a title, and a comment to the article.
HTML task. To complete this task, the agent will need to replace the selected stories in an HTML template to generate the final newsletter file.
As I mentioned above, this is a trial and error process. I started off with 4 tasks (I had an extra summary task), but I found that the researcher can do the summary as well without any issues. So I removed the summary task, and now I have 3 tasks. :)
Fill the tasks.yaml File
Now that we have our tasks, we can fill the tasks.yaml file with the tasks that our agents will need to complete. Think of it as writing the prompt for your agents. A task in CrewAI contains the following properties:
- Description: A detailed prompt outlining what the task is supposed to do.
- Expected Output: The expected output of the task. This is what the agent should return when the task is completed. You can use Few-Shot Learning (include a few examples of the expected output) here.
- Tools: The tools that the agent can use to complete the task. You can also bind the tools to the agent instead of the task.
After some testing and iterations, I came up with the following tasks:
research_task:
  description: >
    Conduct a thorough research about the latest news on {topic}.
    Be sure to look for sources that are reliable and publish recent news.
    Do not include articles that are not news material or that are not
    directly related to {topic}.

    With this research, compile a list of the most relevant news
    stories that you found.

    Follow these rules:
    - Only include articles that are especially relevant to {topic}.
    Do not include any news that are not directly related to {topic}.
    - Do not include sources that are not a news article.
    If the content of the page includes a list of articles or
    looks like the front page of a website, do not include it in the list!
    - Summarize the news in a few sentences. Make the summary as long
    as necessary to include all the relevant information, but not too
    long for a newsletter.
    - Include the URL of the article where you found the news.
    - Include a minimum of 7 news articles and a maximum of 10 news
    articles in the list.
    - When using the Search Tool, your search query should be concise
    (for example, "latest news on {topic}").

    IMPORTANT INSTRUCTIONS ABOUT USING TOOLS: When using tools,
    DO NOT ESCAPE the underscore character "_", EVER. If you need
    to use a tool and pass in a parameter called 'search_query',
    you should write 'search_query', not 'search\_query'.
    THIS IS VERY IMPORTANT, else the tool will not work.

  expected_output: >
    A markdown document with the most relevant news stories. Each
    news story should contain the following:
    - Title of the news
    - Summary of the news
    - URL of the article where the news was found

    Here is an example of the format of a news article that you
    could include in the document:

    <EXAMPLE>
      Story 1:
      - Title: **Daily briefing: AI now beats humans at basic reading
      and maths**
      - **Summary:** AI systems can now nearly match and sometimes exceed
      human performance in basic tasks. The report discusses the need for new
      benchmarks to assess AI capabilities and highlights the ethical
      considerations for AI models.
      - **URL:** [Nature Article](https://www.nature.com/articles/d41586-024-01125-1)
    </EXAMPLE>

edit_task:
  description: >
    Given the list of news articles that will be used in the newsletter,
    do the following things:

    - Rewrite the title of each news article to make it more engaging and
    interesting for the readers of the newsletter.
    - Add a paragraph to each news article that explains why this news is
    important and how it can impact the readers of the newsletter.
    - Reorder the bullet points in a way that the most relevant news and
    topics are at the top of the list based on the importance of the news
    and topics.
    - Verify that the news articles are directly related to {topic} and that
    they are not off-topic. If they are off-topic, remove them from the list.
    - Verify that the URLs are correct and that they lead to the correct news
    article. They should lead to a news article and not to a list of articles
    or the front page of a website. If the URL is incorrect, ask the researcher
    to provide the correct URL.
    - Do not search for additional news articles or change the content of the
    news articles. Only edit the existing news articles.

    IMPORTANT INSTRUCTIONS ABOUT USING TOOLS: When using tools, DO NOT ESCAPE
    the underscore character "_", EVER. If you need to use a tool and pass in
    a parameter called 'search_query', you should write 'search_query', not
    'search\_query'. THIS IS VERY IMPORTANT, else the tool will not work.

  expected_output: >
    A markdown document with all the news to be included in the newsletter
    of the week. The document should have a title related to the curated
    stories of the week and a list of news articles.

    Each one should contain:
    - Title:
    - Summary:
    - Why this is important:
    - Source: [URL of the article]

    Here is an example of a document that you are expected to produce:
    <EXAMPLE>
    Title of the day: AI is taking over the world

      - **Title:** AI Surpasses Human Capabilities in Basic Reading and Maths
        **Summary:** Recent advancements in AI technology have enabled
        systems to match and sometimes exceed human performance in fundamental
        tasks such as reading and arithmetic. This shift necessitates the
        creation of new benchmarks to appropriately evaluate AI capabilities.
        **Why this is important:** This development is crucial as it not only
        showcases the rapid progress in AI but also prompts a reevaluation of
        how AI is integrated into educational and professional settings. It
        raises significant ethical questions about the future role of AI in society.
        **Source:** "Title of the article" by ["Source"](https://www.nature.com/articles/d41586-024-01125-1)

        [... more news articles ...]

    </EXAMPLE>

newsletter_task:
  description: >
    Fill the following HTML template with exactly the same information that
    is given to you. Also, include the following personal message at the
    beginning of the newsletter in the space provided: {personal_message}

    (If there is no personal message, leave the space empty.)

    Follow these rules:
    - Do not truncate the information or change the order of the elements.
    - Do not modify the content of the news articles.
    - Do not add any additional information to the newsletter.
    - Add ALL the news stories provided to the newsletter. Even if the
    template only shows one news story, you should include all the news
    stories provided as context using the format provided in the template.

    {html_template}
  expected_output: >
    Return ONLY the contents of the HTML template, without any tripple
    quotes like '```', '```html' or any other text.
    This output will be saved as a HTML file and sent to the subscribers.
Step 3: Create the agents
Now that we have our tasks, we can start creating the agents that will perform the tasks. An agent in CrewAI is a LangChain Runnable that can use tools to perform tasks. The agent can use the tools to perform the tasks that we defined in the tasks.yaml file.
To initialize an Agent object, you can specify many parameters. But the most important ones are:
- Role: This can be
researcher,editor,html_generator, etc. - Goal: This is a brief description of what your agent’s overal goal is. Try to be precise and give your agent a good idea of what its importance is within the entire project.
- Backstory: This is a brief description of the agent’s background. This is useful to give your agent a personality and a particular expertise. For example, you can say that the agent is a senior journalist known for its wit and humor. This will influence the writing style of the agent.
Here is an example of an agent that I created for the research task:
researcher:
  role: >
        Senior Researcher
  goal: >
        Uncover cutting-edge developments in {topic}.
  backstory: >
    You're a seasoned journalist with a nose for news. You're known for your great research skills and ability to dig up the most interesting stories. Your reports are always thorough and well-researched, making you a trusted source of information.
    You always follow the rules and guidelines provided to you and you never forget to include the complete URL of the article where you found the news.

editor:
  role: >
        Editor-in-Chief
  goal: >
        Ensure the quality and accuracy of the final newsletter.
  backstory: >
    You are the Editor-in-Chief of a prestigious news organization. You are responsible for overseeing the production of the newsletter and ensuring that it meets the highest standards of quality, that it is accurate, well-written, and engaging.
    You review the news articles provided by the researcher, add context to each article (like why the news story is relevant), and have a great sense of what will resonate with the readers. You use this sense of judgment to reorder the news articles in a way that the most important news is at the top of the list.

designer:
  role: >
        Newsletter Compiler
  goal: >
        Fill the HTML template given to you with the news articles provided.
  backstory: >
    You are responsible for compiling the HTML code of the newsletter, making sure that every news article is included in the final document.
    You do NOT modify the content and only update the design when necessary. You use the HTML template provided to you to create the newsletter.
Step 4: Create the tools
The tools are the functions that the agents will use to perform the tasks (that is why it is so important to use an LLM that supports function calling). We will then bind these tools to the agents when initializing them.
In this example, we will be giving the research tools to the researcher and editor agents. The tools that we will be using will use the following methods from the Exa client:
search_and_contents: This tool will search a given query and return the full text contents each article.find_similar: This tool will find similar articles to the ones that we pass in.get_contents: This tool will get the contents of a given URL.
Here is an example of the tools that I created for the researcher agent:
from crewai_tools import BaseTool
from exa_py import Exa
from datetime import datetime, timedelta
import os


class Search(BaseTool):
    name: str = "Search Tool"
    description: str = (
        "Searches the web based on a search query. Results are only from the last week. Uses the Exa API."
    )

    def _run(self, search_query: str) -> str:

        one_week_ago = datetime.now() - timedelta(days=7)
        date_cutoff = one_week_ago.strftime("%Y-%m-%d")

        exa = Exa(os.getenv("EXA_API_KEY"))

        search_response = exa.search_and_contents(
            search_query,
            use_autoprompt=True,
            start_published_date=date_cutoff,
            text={"include_html_tags": False, "max_characters": 8000},
        )

        return search_response


class FindSimilar(BaseTool):
    name: str = "Find Similar Tool"
    description: str = (
        "Searches for similar articles to a given article using the Exa API. Takes in a URL of the article."
    )

    def _run(self, url: str) -> str:

        one_week_ago = datetime.now() - timedelta(days=4)
        date_cutoff = one_week_ago.strftime("%Y-%m-%d")

        exa = Exa(os.getenv("EXA_API_KEY"))

        search_response = exa.find_similar(url, start_published_date=date_cutoff)

        return search_response


class GetContents(BaseTool):
    name: str = "Get Contents Tool"
    description: str = (
        "Gets the contents of a specific article using the Exa API. Takes in the ID of the article in a list, like this: ['https://www.cnbc.com/2024/04/18/my-news-story']."
    )

    def _run(self, ids: str) -> str:
        exa = Exa(os.getenv("EXA_API_KEY"))
        contents_response = exa.get_contents(ids)
        return contents_response
As you can see, the tools are simple classes that inherit from BaseTool and have a _run method that returns the result of the tool.
It is very important to properly document the tools with a name and description attribute. This will help the agents understand what the tool does and how to use it.
It is also a great idea to include an example of the input and output of the tool in the description.
Step 5: Put everything together
Once that everything is put together, you can put everything together in your crew.py file. This file will initialize the agents and tasks, bind the tools to the agents and create the crew.
Here is an example of a crew.py file:
from crewai import Agent, Crew, Process, Task
from crewai.project import CrewBase, agent, crew, task
from typing import Dict, List, Tuple, Union
from langchain_core.agents import AgentFinish
from langchain_openai import ChatOpenAI

from newsletter_gen.tools.research import Search, FindSimilar, GetContents

import datetime
import json
import os

@CrewBase
class NewsletterGenCrew:
    """NewsletterGen crew"""

    agents_config = "config/agents.yaml"
    tasks_config = "config/tasks.yaml"

    def llm(self):
        llm = ChatOpenAI(api_key=os.environ['OPENAI_API_KEY'], model='gpt-4-turbo')
        return llm

    @agent
    def researcher(self) -> Agent:
        return Agent(
            config=self.agents_config["researcher"],
            tools=[Search(), FindSimilar(), GetContents()],
            verbose=True,
            llm=self.llm(),
        )

    @agent
    def editor(self) -> Agent:
        return Agent(
            config=self.agents_config["editor"],
            verbose=True,
            tools=[Search(), FindSimilar(), GetContents()],
            llm=self.llm(),
        )

    @agent
    def designer(self) -> Agent:
        return Agent(
            config=self.agents_config["designer"],
            verbose=True,
            llm=self.llm(),
            allow_delegation=False,
        )

    @task
    def research_task(self) -> Task:
        return Task(
            config=self.tasks_config["research_task"],
            agent=self.researcher(),
            output_file=f'logs/{datetime.datetime.now().strftime("%Y-%m-%d_%H-%M")}_research_task.md',
        )

    @task
    def edit_task(self) -> Task:
        return Task(
            config=self.tasks_config["edit_task"],
            agent=self.editor(),
            output_file=f'logs/{datetime.datetime.now().strftime("%Y-%m-%d_%H-%M")}_edit_task.md',
        )

    @task
    def newsletter_task(self) -> Task:
        return Task(
            config=self.tasks_config["newsletter_task"],
            agent=self.designer(),
            output_file=f'logs/{datetime.datetime.now().strftime("%Y-%m-%d_%H-%M")}_newsletter.html',
        )

    @crew
    def crew(self) -> Crew:
        """Creates the NewsletterGen crew"""
        return Crew(
            agents=self.agents,
            tasks=self.tasks,
            process=Process.sequential,
            verbose=2,
        )
Note that this is the crew.py file that was generated by the CrewAI CLI. It uses some decorators to make simple tasks easier, such as loading the configuration files and creating the agents and tasks. These decorators deal with some logic behind the scenes that might obscure the code a bit. For example, by using the @agent, @task and @crew decorators, the framwork will automatically create the properties self.agents, self.tasks and pass them to the Crew object.
Pass the inputs to your crew
Now you just have to pass the inputs to your crew. This is found in the main.py file that was generated by the CLI. Here is an example of how you can pass the inputs to your crew:
#!/usr/bin/env python
from newsletter_gen.crew import NewsletterGenCrew
import os

def load_html_template():
    with open("src/newsletter_gen/config/newsletter_template.html", "r") as file:
        html_template = file.read()
    return html_template


def run():
    inputs = {
        "topic": input("Enter the topic: "),
        "html_template": load_html_template(),
    }
    NewsletterGenCrew().crew().kickoff(inputs=inputs)
Notice that we are passing the inputs to the crew here. These are the variables that were passed to the prompts in the tasks.yaml and agents.yaml files (those in curly braces {}).
Step 6: Run the crew
Once everything is set up, you can run the crew using the CrewAI CLI. Remember that we are using poetry to manage the dependencies, so you should make sure that all your dependencies are installed in the virtual environment that you are using.
To run the crew, you can use the following command:
$ poetry lock
$ poetry install
$ poetry run <YOUR_CREW_NAME>
If you are unsure about the name of your crew, you can check the readme.md file that was generated by the CLI. It will contain detailed instructions on how to run your crew.
Conclusion
In this tutorial, we created a team of AI agents that can generate a newsletter for us. We used CrewAI to orchestrate the agents and tasks, and we used the Exa API to search for the latest news on a given topic. We also learned how to define the tasks that our agents will need to complete, how to create the agents that will perform the tasks, and how to bind the tools to the agents. Finally, we learned how to put everything together and run the crew.