Introduction
💡 Quick Links:
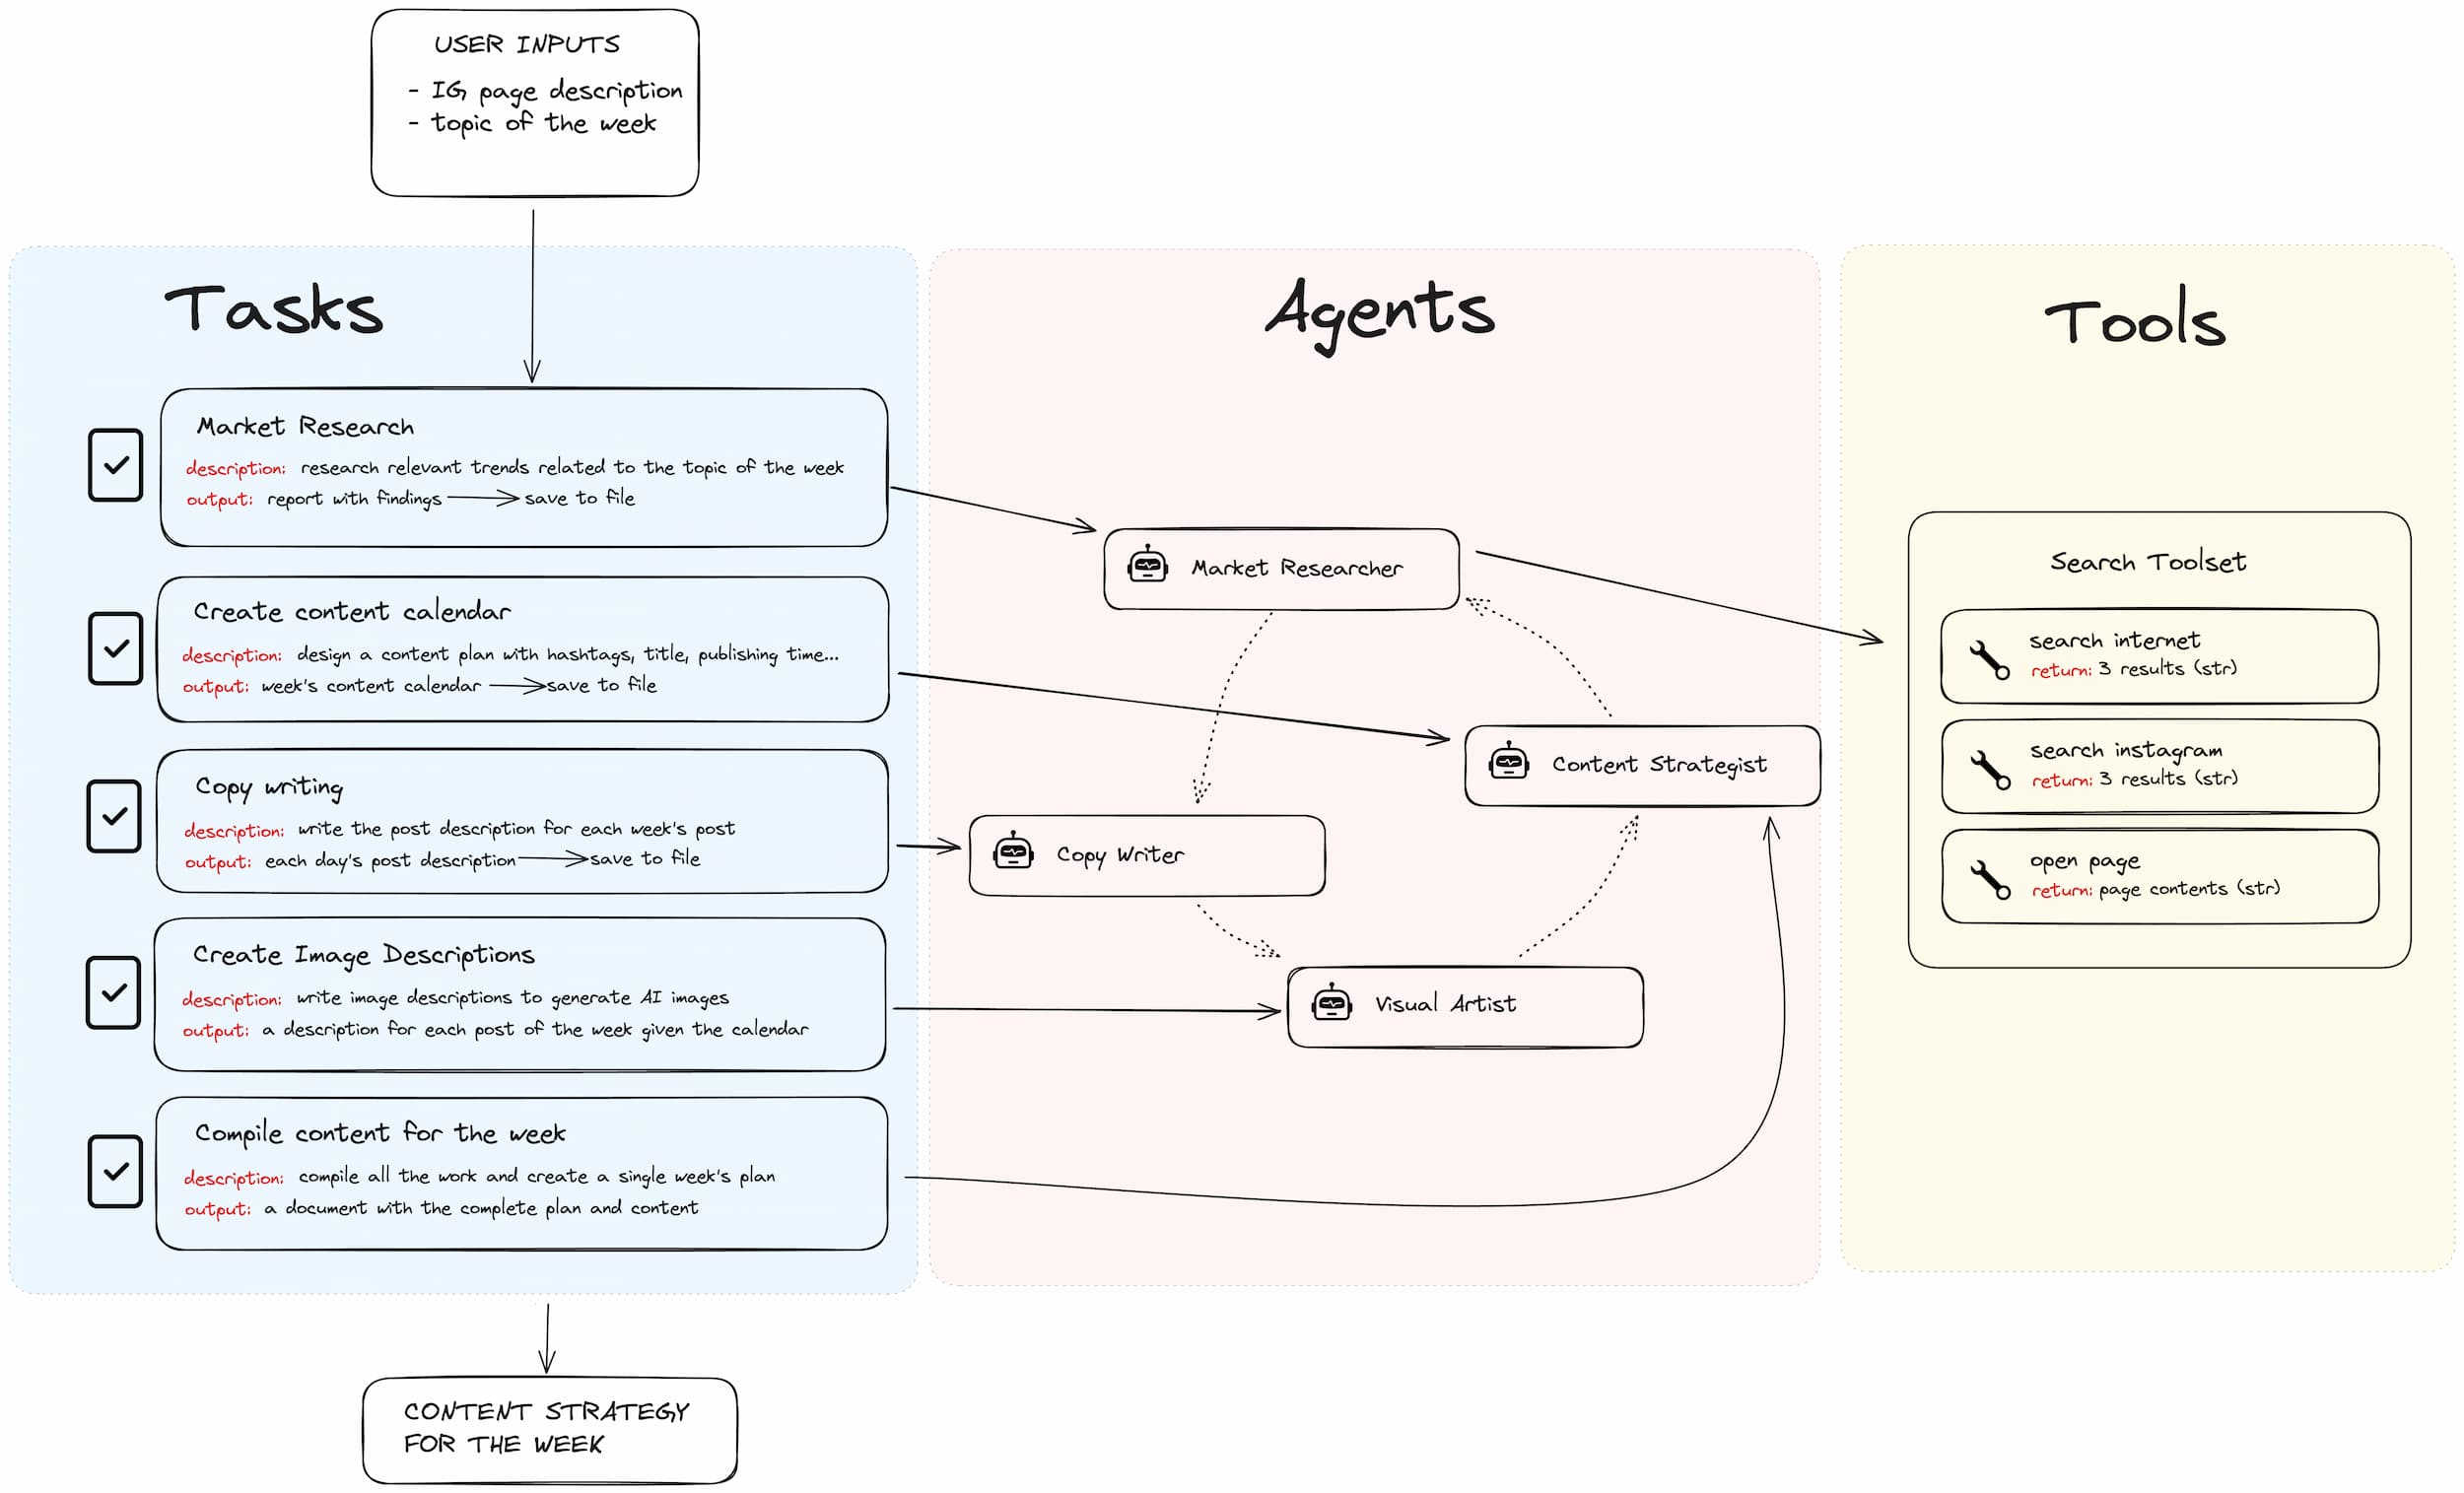
In this tutorial, you will learn how to create a crew of AI agents to automate your Instagram content strategy. In it, these agents are able to do the following things for you:
- Perform some research about the latest trends in your niche.
- Find the best SEO keywords and tools for your posts.
- Create a calendar of posts with best posting times for each day of the week.
- Write the copy of each one of your posts.
- Generate the AI images for each post of the week.
To do this, you will have a crew of AI agents that collaborate with each other, just like if you replaced your marketing strategy team with AI agents.
In order to do this, we will be building up on the previous tutorial where we learned how CrewAI works. This might look daunting, but I promise that it is easier than it looks.
So let’s get started!
We will be introducing the following topics:
- CrewAI CLI
- Creating Tools that work
- Debugging your crew
CrewAI CLI
This time, we will be bootstrapping our project using the CrewAI CLI. The CLI is a powerful tool that allows you to create all the components of a CrewAI project in a single command. The CLI comes installed with the CrewAI package, so you don’t need to install it separately:
$ pip install crewai
$ crewai create my-crew
This will create a new directory called my-crew with the following structure:
my-crew/
├── src/
│   ├── my_crew/
│   │   ├── __init__.py
│   │   ├── crew.py
│   │   ├── main.py
│   │   ├── tools/
│   │   │   ├── __init__.py
│   │   │   ├── my_tool.py
│   │   ├── config
│   │   │   ├── agents.yaml
│   │   │   ├── tasks.yaml
│   │   │   ├── tools.yaml
│   ├── tests/
│   │   ├── __init__.py
│   │   ├── test_crew.py
│   │   ├── test_tools.py
│   ├── __init__.py
├── .gitignore
├── README.md
├── pyproject.toml
├── .env.example
As you can see, the CLI creates everything you need for a new crew project. The most important things to consider here are:
- Your agents configuration is defined in
src/my_crew/config/agents.yaml. Here is where you will write their backstories, goals and other params that you need to define your agents. - Your tasks configuration is defined in
src/my_crew/config/tasks.yaml. Here is where you define the tasks that your agents will perform. - Your crew is defined in
src/my_crew/crew.py. Here is where you define your crew’s agents and their tasks. It contains all the decorators and functions you need to define your crew. This file loads the configuration from theconfigfolder and creates the agents and tasks.
Now you will have to install the dependencies and create a .env file with your Serper API key. You can get your Serper API key by signing up at Serper.
$ cd my-crew
$ poetry lock
$ poetry install
$ cp .env.example .env
Planning our crew
The diagram above looks all very pretty, but in order to get there, we needed to do some thinking. The good news, is that CrewAI has a GPT that can help you with that. Just describe your situation to their assistant and it will help you plan your crew. It may give you the full agents and tasks that you need to define, or it may give you some ideas to start with.
Let’s say that, after your description, it gave you something like this:
market_researcher:
  role: >
    Instagram Market Researcher
  goal: >
    Analyze industry trends, competitor activities, and popular hashtags on Instagram.
  backstory: >
    Armed with a keen eye for digital trends and a deep understanding of the Instagram landscape, you excel at uncovering actionable insights from social media data. Your analytical skills are unmatched, providing a solid foundation for strategic decisions in content creation. You are great at identifying the latest trends and the best hashtags for a given campaign.


[...]
We can refine our agents and tasks from there. We can also add more agents and tasks as we see fit. Only then will we get to a plan that looks like the one above.
Adding our agents and tasks
Now that we have our agents and tasks defined, we can add them to our crew. We will be using the @agent and @task decorators to define our agents and tasks. We can go to src/my_crew/crew.py and add our agents and tasks there.
from crewai import Agent, Crew, Process, Task
from crewai.project import CrewBase, agent, crew, task
# from instagram_planner.tools.search import SearchTools


@CrewBase
class InstagramPlannerCrew:
    """InstagramPlanner crew"""

    agents_config = "config/agents.yaml"
    tasks_config = "config/tasks.yaml"

    @agent
    def market_researcher(self) -> Agent:
        return Agent(
            config=self.agents_config["market_researcher"],
            tools=[
                # SearchTools.search_internet,
                # SearchTools.search_instagram,
                # SearchTools.open_page,
            ],
            verbose=True,
        )

    @agent
    def content_strategist(self) -> Agent:
        return Agent(
            config=self.agents_config["content_strategist"],
            verbose=True,
        )

    @agent
    def visual_creator(self) -> Agent:
        return Agent(
            config=self.agents_config["visual_creator"],
            verbose=True,
            allow_delegation=False,
        )

    @agent
    def copywriter(self) -> Agent:
        return Agent(
            config=self.agents_config["copywriter"],
            verbose=True,
        )

    @task
    def market_research_task(self) -> Task:
        return Task(
            config=self.tasks_config["market_research_task"],
            agent=self.market_researcher(),
            output_file="market-research-report.md",
        )

    @task
    def content_strategy_task(self) -> Task:
        return Task(
            config=self.tasks_config["content_strategy_task"],
            agent=self.content_strategist(),
        )

    @task
    def visual_content_creation_task(self) -> Task:
        return Task(
            config=self.tasks_config["visual_content_creation_task"],
            agent=self.visual_creator(),
            allow_delegation=False,
        )

    @task
    def copywriting_task(self) -> Task:
        return Task(
            config=self.tasks_config["copywriting_task"],
            agent=self.copywriter(),
            allow_delegation=False,
            max_iter=1,
        )

    @task
    def report_final_content_strategy(self) -> Task:
        return Task(
            config=self.tasks_config["report_final_content_strategy"],
            agent=self.content_strategist(),
            output_file="final-content-strategy.md",
            max_iter=1,
        )

    @crew
    def crew(self) -> Crew:
        """Creates the InstagramPlanner crew"""
        return Crew(
            agents=self.agents,  # Automatically created by the @agent decorator
            tasks=self.tasks,  # Automatically created by the @task decorator
            process=Process.sequential,
            verbose=2,
            # process=Process.hierarchical, # In case you wanna use that instead https://docs.crewai.com/how-to/Hierarchical/
        )
The decorators @agent and @task are used to define the agents and tasks of your crew. The @crew decorator is used to define the crew itself. They add some abscration to your code. For example, one thing they do is load all your agents and tasks from the defined configuration file locations.
It is up to you to decide if you want to take advantage of these abstractions or if you prefer to define your own crew manually like we did in previous tutorials.
Now, do you see the commented lines in the market_researcher agent? Those are the tools that we will be using to help our agent perform its tasks. We will be creating those tools in the next section.
Creating Tools that work
The tools are the functions that your agents will use to perform their tasks. They are defined in the src/my_crew/tools folder. You can create as many tools as you want, but it is recommended to keep them simple and focused on a single task.
In our case, we will be using Serper API to search the internet for information about a given topic. That tool will be used by our market_researcher agent to perform its tasks. We will also define a tool to open a webpage and read its content. This tool will require the WebBaseLoader class from the langchain_community package (for which we have to install beautifultsoup4 and requests):
$ pip install beautifulsoup4 requests
import json
import os

import requests
from langchain.tools import tool
from langchain_community.document_loaders import WebBaseLoader


class SearchTools:

    @tool("search_internet")
    def search_internet(query):
        """Useful to search the internet about a given topic and return relevant
        results."""
        return SearchTools.search(query)

    @tool("search_instagram")
    def search_instagram(query):
        """Useful to search for instagram post about a given topic and return relevant
        results."""
        query = f"site:instagram.com {query}"
        return SearchTools.search(query)

    @tool("open_page")
    def open_page(url):
        """Useful to open a webpage and read its content. Use this to get further information from the results of the internet search."""
        loader = WebBaseLoader(url)
        return loader.load()

    def search(query, n_results=5):
        url = "https://google.serper.dev/search"
        payload = json.dumps({"q": query})
        headers = {
            "X-API-KEY": os.environ["SERPER_API_KEY"],
            "content-type": "application/json",
        }
        response = requests.request("POST", url, headers=headers, data=payload)
        results = response.json()["organic"]
        string = []
        for result in results[:n_results]:
            try:
                string.append(
                    "\n".join(
                        [
                            f"Title: {result['title']}",
                            f"Link: {result['link']}",
                            f"Snippet: {result['snippet']}",
                            "\n-----------------",
                        ]
                    )
                )
            except KeyError:
                next

        content = "\n".join(string)
        return f"\nSearch result: {content}\n"
The tools are defined as static methods of a class. The @tool decorator is used to define the name of the tool. The name of the tool is the name that you will use to call the tool in your agents. Remember to describe the tool in the docstring of the method so that it can be used by the agent to perform its tasks.
Testing our crew
Now that we have our crew defined, we can test it by running the following command:
$ poetry run my_crew
Remember to add the following keys to your .env file in order to use LangSmith to monitor your crew:
LANGCHAIN_TRACING_V2=true
LANGCHAIN_API_KEY=your_api_key
You can get your API key by signing up at LangSmith.
This will allow you to monitor all the tasks that your crew is performing in real-time. You can also use the LangSmith dashboard to see the logs of your crew and to debug it if something goes wrong.
My testing results
After running my crew, I got the following results:
Giving Agents Memory
Communication between agents was good, but we did not implement memory here. This means that the agents were not able to remember information from previous tasks.
To be precise, at some pointm the Copy Writer agent asked the Market Researcher agent for information about the latest hashtags, and the Market Researcher agent started a whole new search on the internet. This is not ideal because the Market Researcher agent had already done that search before and even produced a report about it. It just did not remember that information.
This could also be solved by manually assigning the output of specific previous tasks as context to the tasks that need them. But that does not seem to be very easily done when using the CrewAI setup provided by the CLI.
We will be implementing memory in the next tutorial. Stay tuned!
Delegating Tasks
In earlier test, some agents over-delegated tasks to other agents. This is not ideal because it can lead to too many API calls and raise the cost of running the crew. That is why I set the allow_delegation parameter to false in the visual_creator and copywriter agents.
Try to do this for all your agents that do not need to delegate tasks. This will make your crew more efficient and cost-effective.
Conclusion
In this tutorial, we learned how to automate our Instagram strategy with CrewAI. We used the CrewAI CLI to create our crew and defined our agents and tasks. We also created tools that our agents used to perform their tasks. We tested our crew and learned how to monitor it using LangSmith.