In the previous tutorial, we built an AI agent from scratch using only API calls. We learned how agents work under the hood: the agentic loop, tool schemas, and message history management.
That was great for understanding the fundamentals. But in production, you don’t want to manage all that complexity yourself. That’s where agent frameworks come in.
In this tutorial, we’ll use smolagents, a minimalist agent library from Hugging Face. It implements the ReAct pattern and handles all the boilerplate we wrote manually last time.
By the end of this tutorial, you’ll be able to:
- Create agents with pre-built tools
- Build custom tools with the
@tooldecorator - Share tools on the Hugging Face Hub
- Use Gradio Spaces as tools
- Spin up a chatbot UI for your agent
Let’s get started.
Setup
Install smolagents:
pip install smolagents
Set up your API keys:
import os
import getpass

os.environ["HF_TOKEN"] = getpass.getpass("Hugging Face Token: ")
Your First Agent
Remember all the code we wrote last time? The Agent class, the tool schemas, the execution loop? With smolagents, we can create the same thing in just a few lines:
from smolagents import ToolCallingAgent, WebSearchTool, InferenceClientModel

model = InferenceClientModel(
    api_key=os.getenv('HF_TOKEN'),
    model_id="deepseek-ai/DeepSeek-V3.2",
    provider="novita",
    bill_to="huggingface"
)

agent = ToolCallingAgent(
    tools=[WebSearchTool()],
    model=model
)
That’s it. We have an agent with web search capabilities. Let’s test it:
agent.run("Who is the current president of France?")
The agent will:
- Receive the query
- Decide to use the web search tool
- Execute the search
- Return a comprehensive answer
All with the same flow we implemented manually before, but handled by the framework.
Using Different Models
smolagents supports multiple model providers. Here’s how to use OpenAI:
from smolagents import OpenAIModel

model = OpenAIModel(
    api_key=os.getenv('OPENAI_API_KEY'),
    model_id="gpt-4o-mini",
)
Or any OpenAI-compatible API (like Anthropic):
model = OpenAIModel(
    api_key=os.getenv('ANTHROPIC_API_KEY'),
    model_id="claude-sonnet-4-5",
    api_base="https://api.anthropic.com/v1/"
)
How It Works
Under the hood, smolagents follows the same pattern we built from scratch. Here’s a quick refresher:
When you call agent.run(), the framework:
- Sends your query to the LLM along with available tools
- If the LLM returns a tool call, executes it
- Adds the tool result to the message history
- Repeats until the LLM returns a final answer
This is the same loop we implemented in the execute() method of our custom Agent class. The framework just handles it for us.
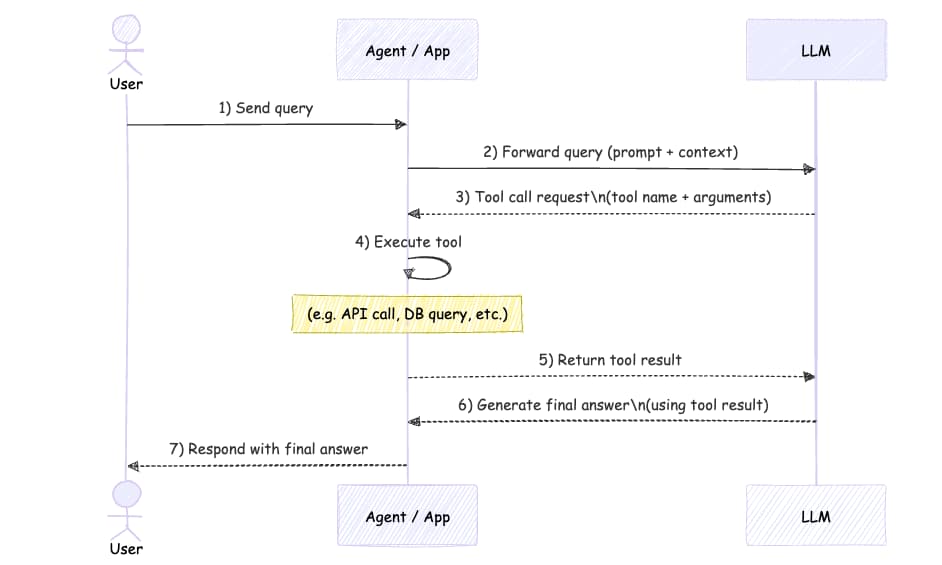
The sequence diagram shows the full flow: user sends a query, agent forwards to LLM, LLM requests tool calls, agent executes tools, sends results back, and finally returns the answer to the user.
Creating Custom Tools
smolagents comes with some pre-built tools like WebSearchTool. But the real power comes from creating your own tools.
Let’s build a text-to-image tool:
from smolagents import tool

@tool
def generate_image(prompt: str) -> dict:
    """
    Generate an image from a prompt.

    Args:
      prompt: The prompt to generate the image from.

    Returns:
      The generated image.
    """
    from huggingface_hub import InferenceClient
    import os

    image_client = InferenceClient(provider="fal-ai", api_key=os.getenv("HF_TOKEN"))
    pil_image = image_client.text_to_image(prompt, model="Tongyi-MAI/Z-Image-Turbo")
    return pil_image
The @tool decorator does all the heavy lifting:
- Parses the docstring to extract the description
- Creates the JSON schema from type hints
- Makes the function usable as an agent tool
Notice how similar this is to what we did manually. In the previous tutorial, we had to define schemas like this:
get_temperature_tool_schema = {
    "type": "function",
    "function": {
        "name": "get_temperature",
        "description": "Get the current temperature in a given city.",
        "parameters": {...}
    }
}
Now the @tool decorator generates all of that from the function signature and docstring.
Combining Multiple Tools
The real magic happens when you combine multiple tools. Image models don’t know current events, but web search does:
import datetime
from smolagents import ToolCallingAgent, WebSearchTool

agent = ToolCallingAgent(
    tools=[WebSearchTool(), generate_image],
    model=model
)

agent.run(f"""
Current date: {datetime.datetime.now().strftime("%Y-%m-%d")}
Generate an image of the current president of France drinking coffee.
Return only the image.
""")
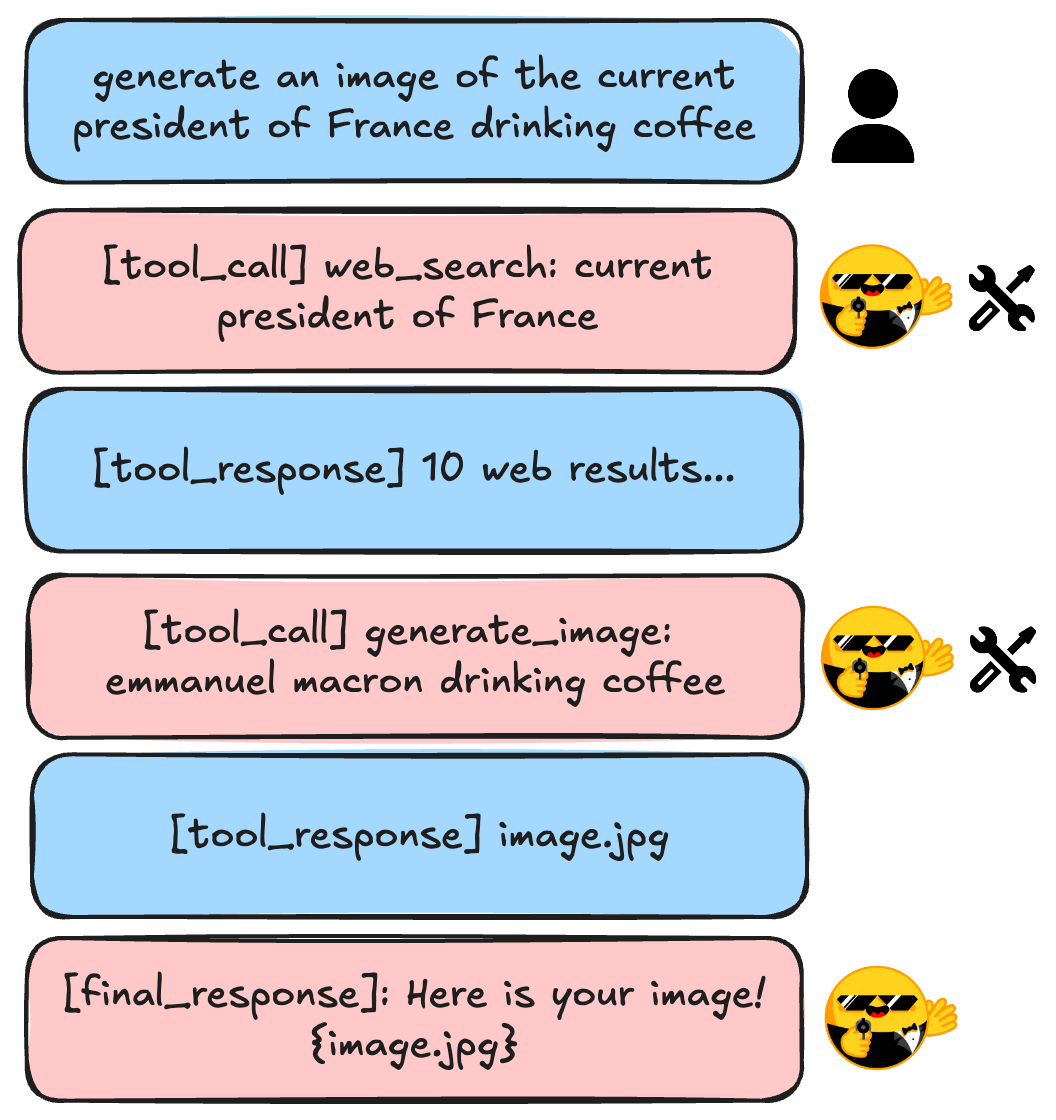
The agent will:
- Search the web to find out who the current president is (Emmanuel Macron)
- Use that information to craft a better image prompt
- Generate and return the image
This is the power of agentic systems: they can chain tools together to accomplish tasks that no single tool could handle alone.
Sharing Tools on the Hub
Built a useful tool? Share it with the community:
generate_image.push_to_hub(
    "your-username/your-tool-name",
    token=os.getenv("HF_TOKEN")
)
This creates a Hugging Face Space with your tool that anyone can use.
Loading Tools from the Hub
To use someone else’s tool:
from smolagents import Tool

image_tool = Tool.from_hub(
    repo_id="alejandro-ao/z-image-turbo",
    api_key=os.getenv("HF_TOKEN"),
    trust_remote_code=True,
)

agent = ToolCallingAgent(
    tools=[WebSearchTool(), image_tool],
    model=model,
)
This makes it easy to build on top of what others have created.
Using Spaces as Tools
Here’s something powerful: you can use any Gradio Space as a tool. This means thousands of existing Spaces become instant agent tools.
from smolagents import Tool, WebSearchTool

flux_tool = Tool.from_space(
    space_id="black-forest-labs/FLUX.1-dev",
    name="generate_image",
    description="Generate an image from a prompt"
)

agent = ToolCallingAgent(
    tools=[flux_tool, WebSearchTool()],
    model=model,
)

agent.run("Generate an image of the current top artist on Spotify playing trumpet. Return only the image.")
The agent uses FLUX.1, one of the best open-source image models, without us having to write any integration code.
Building a Chatbot UI
Want to test your agent interactively? smolagents includes a Gradio UI out of the box:
from smolagents import GradioUI

gradio_ui = GradioUI(agent, reset_agent_memory=True)
gradio_ui.launch()
This spins up a chat interface where you can interact with your agent. The reset_agent_memory=True flag clears the conversation history between messages, which is useful for testing.
Recap
We went from building agents from scratch to using a production-ready framework. Here’s what smolagents gives you:
- Pre-built tools: Web search, Python execution, and more
- Easy tool creation: The
@tooldecorator handles schemas automatically - Hub integration: Share and reuse tools from the community
- Space tools: Use any Gradio Space as an agent tool
- Built-in UI: Spin up a chatbot interface instantly
The best part? Now that you understand what’s happening under the hood from our previous tutorial, you can debug issues, optimize performance, and extend the framework when needed.
What’s Next?
In future tutorials, we’ll explore:
- Multi-agent systems where agents collaborate
- Code agents that write and execute Python
- RAG agents that search through documents
- Building and deploying production-ready agent applications
Full Code
Here’s the complete example for reference:
import os
import getpass
import datetime
from smolagents import (
    ToolCallingAgent,
    WebSearchTool,
    InferenceClientModel,
    GradioUI,
    tool
)

# Setup
os.environ["HF_TOKEN"] = getpass.getpass("Hugging Face Token: ")

# Initialize model
model = InferenceClientModel(
    api_key=os.getenv('HF_TOKEN'),
    model_id="deepseek-ai/DeepSeek-V3.2",
    provider="novita",
    bill_to="huggingface"
)

# Create custom tool
@tool
def generate_image(prompt: str) -> dict:
    """
    Generate an image from a prompt.

    Args:
      prompt: The prompt to generate the image from.

    Returns:
      The generated image.
    """
    from huggingface_hub import InferenceClient
    image_client = InferenceClient(provider="fal-ai", api_key=os.getenv("HF_TOKEN"))
    pil_image = image_client.text_to_image(prompt, model="Tongyi-MAI/Z-Image-Turbo")
    return pil_image

# Create agent with multiple tools
agent = ToolCallingAgent(
    tools=[WebSearchTool(), generate_image],
    model=model
)

# Run the agent
result = agent.run(f"""
Current date: {datetime.datetime.now().strftime("%Y-%m-%d")}
Generate an image of the current president of France drinking coffee.
Return only the image.
""")

# Or launch the UI
# gradio_ui = GradioUI(agent, reset_agent_memory=True)
# gradio_ui.launch()